
Download Bitfinity Wallet
- Chrome & Chromium: Extension Store
- Visit our community and chat with the team in our social channels.
- Follow us on Twitter to stay updated with progress on development.
Browser Extension
Interacting with InfinityWallet extension is made possible by an IC Provider API, an API that InfinityWallet injects into webpages to allow them interact with the extension.
To get started, install the infinitywallet browser extension, pin the extension to your browser bar for easy access (an example of how to go about that in Chrome).
Once the InfinityWallet extension is installed, an infinityWallet object will be available as a property of window.ic on the browser window or tabs. Your application will be able to detect it by checking the window object and if available, interact with it!
Console playground
Once you have the extension, run a quick test to detect it by opening the browser developer console (here's an example for Chrome and Firefox). Note that if you just installed the extension, you need to refresh the page (F5 on Windows) so that it is detected correctly.
Copy and paste the following code snippet into the console and execute it by pressing the ENTER key on your keyboard.
window.ic.infinityWallet && 'InfinityWallet!';
if you have the extension installed correctly, the output will be InfinityWallet!.
In case of an error, check the installation instructions above and ensure that you have it installed correctly!
InfinityWallet window object
InfinityWallet provides a simple API to websites and webapps at window.ic.infinityWallet, enabling them to "interact with" the Internet computer via InfinityWallet.
As we continue to develop features and make them available, the API will let you:
- Detect the InfinityWallet extension
- Interact and authenticate an account
- Query data from the Internet Computer
- Trigger a transaction for the end-user approval
As previously noted, you can interact directly with the API through the browser developer console.
Copy and paste the following code snippet into the console and execute it:
window.ic.infinityWallet.requestConnect();
!!! Important
Because of browser security restrictions, access to the InfinityWallet extension API is only allowed from pages accessed via HTTP/HTTPS. For example, you'd be allowed to interact with it from the current [](https://app.infinityswap.one/), but not the default options page `chrome-extension://xxxx/options.html`.
An InfinityWallet notification window will pop-up, displaying the options to Allow or Decline the connection to the user wallet:
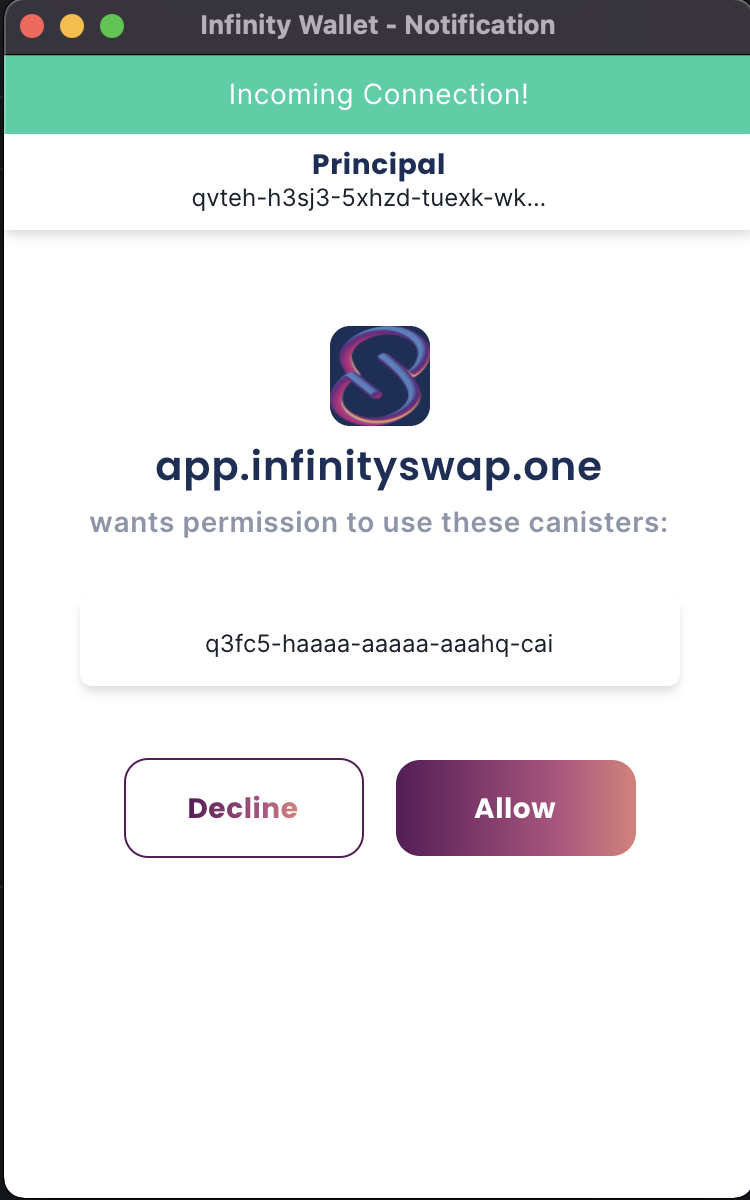
After you Allow or Decline, the notification popup will close!
To understand how to read the response data for the requestConnect call and any other asynchronous method, read below.
Available interactions and methods
🔌 Connect your App to InfinityWallet
Start interacting with the user's wallet by requesting a connection, and if needed, passing the necessary information to interact with the Actor.
requestConnect(RequestConnectParams?)
requestConnect() is an asynchronous method which requests a new connection by showing a pop-up to the InfinityWallet user.
As an example, copy and paste the following code snippet into the console and execute it.
Select Allow or Decline in the pop-up and to see the corresponding result (Allowed or Declined) in the console.
If accepted, the requestConnect method returns an object containing the publicKey of the connected account.
If declined, the method will throw an error.
(async () => {
  try {
    const publicKey = await window.ic.infinityWallet.requestConnect();
    console.log(`The connected user's public key is:`, publicKey);
  } catch (e) {
    console.log(e);
  }
})();
Optionally, you can pass the following parameters to integrate InfinityWallet's features, for authenticating a user's identity and requesting access to the InfinityWallet to sign requests to your canisters on behalf of that identity.
The fields are:
- whitelist - an Array of Canister Ids of type string
!!! Important
Passing a whitelist is telling InfinityWallet to pass the user a list of canisters that your app will be able to interact with through the InfinityWallet, on their behalf.
This is how it looks:
Object {
  whitelist?: ['canister-id'],
}
Here's an hypothetical example:
(async () => {
  // Canister Ids
  const nnsCanisterId = 'ryjl3-tyaaa-aaaaa-aaaba-cai';

  // Whitelist
  const whitelist = [nnsCanisterId];

  // Make the request
  try {
    const publicKey = await window.ic.infinityWallet.requestConnect({
      whitelist,
    });
    console.log(`The connected user's public key is:`, publicKey);
  } catch (e) {
    console.log(e);
  }
})();
Timeout
We’ve added “timeout” as a parameter that can be added to requestConnect and set as a global variable for the rest of the modals on your dapp. For example, if you set it to 5000, the modal will close in 5000 milliseconds or 5 seconds if the user fails to choose an action. By default, this is set to 2 minutes.
View the code snippet below to view how the timeout parameter is used the correct way in our requestConnect method.
ic.infinityWallet.requestConnect({
  whitelist: [],
  timeout: 50000,
});
isConnected()
isConnected() is an asynchronous method to check the connection status, that returns a Boolean: true or false.
(async () => {
  const result = await window.ic.infinityWallet.isConnected();
  console.log(`InfinityWallet connection is ${result}`);
})();
⚡ Persisting an App/InfinityWallet Connection
After initiating a connection to InfinityWallet with a whitelist, you can add this check as a fallback to ensure the connect persists as the user navigates your application/website.
This checks the status of the connection to the user’s wallet in InfinityWallet; if at any moment it turns into false, it will re-requests it.
const connected = await window.ic.infinityWallet.isConnected();
if (!connected) await window.ic.infinityWallet.requestConnect({ whitelist });
You can use this, for example, in a useEffect inside of your apps main component (index/app) to do a check after load. You can pass on the same whitelist as before (won’t require re-approval by the user, unless access was revoked), or a different whitelist Canister ID is set (will require the user’s approval).
const verifyConnection = async () => {
  const connected = await window.ic.infinityWallet.isConnected();
  if (!connected) await window.ic.infinityWallet.requestConnect({ whitelist });
};

useEffect(async () => {
  verifyConnection();
}, []);
📡 Making Calls to Canisters with InfinityWallet
Once connected, you can use InfinityWallet to make proxied calls to a canister on behalf of your users. This is the main way your app will be able to call canisters on behalf of users, like calling a query or update method on your app's BE canister etc.
- First, connect to InfinityWallet and pass a whitelist of canisters you need to interact to.
- The user will approve the connection, giving you access to the createActor method.
- Use the createActor method to make safe calls to canisters on behalf of users.
createActor() - Making Safe Calls
createActor() is an asynchronous method that creates an Actor to interact with the Internet Computer. Returns an Actor for the provided Canister Id and interface factory (Candid or IDL).
The createActor expects that the wallet is connected beforehand by calling the requestConnect method. Creating an Actor allows you to securely interact with a canister’s interface on behalf of the user.
(async () => {
  // NNS Canister Id as an example
  const nnsCanisterId = 'qoctq-giaaa-aaaaa-aaaea-cai';
  const whitelist = [nnsCanisterId];

  // Initialise Agent, expects no return value
  await window?.ic?.infinityWallet?.requestConnect({
    whitelist,
  });

  // A partial Interface factory
  // for the NNS Canister UI
  const nnsPartialInterfaceFactory = ({ IDL }) => {
    const BlockHeight = IDL.Nat64;
    const Stats = IDL.Record({
      latest_transaction_block_height: BlockHeight,
      seconds_since_last_ledger_sync: IDL.Nat64,
      sub_accounts_count: IDL.Nat64,
      hardware_wallet_accounts_count: IDL.Nat64,
      accounts_count: IDL.Nat64,
      earliest_transaction_block_height: BlockHeight,
      transactions_count: IDL.Nat64,
      block_height_synced_up_to: IDL.Opt(IDL.Nat64),
      latest_transaction_timestamp_nanos: IDL.Nat64,
      earliest_transaction_timestamp_nanos: IDL.Nat64,
    });
    return IDL.Service({
      get_stats: IDL.Func([], [Stats], ['query']),
    });
  };

  // Create an actor to interact with the NNS Canister
  // we pass the NNS Canister id and the interface factory
  const NNSUiActor = await window.ic.infinityWallet.createActor({
    canisterId: nnsCanisterId,
    interfaceFactory: nnsPartialInterfaceFactory,
    host: undefined, // set to http://localhost:8000/ to make calls to local DFX replica
  });

  // We can use any method described in the Candid (IDL)
  // for example the get_stats()
  // See https://github.com/dfinity/nns-dapp/blob/cd755b8/canisters/nns_ui/nns_ui.did
  const stats = await NNSUiActor.get_stats();
  console.log('NNS stats', stats);
})();
Connect to local DFX replica
Set the parameter of host to http://localhost:8000/ or the url from where your local dfx replica is running in the createActor method to connect to the local running instance. Currently the http transport is supported locally (not https).
const NNSUiActor = await window.ic.infinityWallet.
createActor({
    canisterId: nnsCanisterId,
    interfaceFactory: nnsPartialInterfaceFactory,
    host: "http://localhost:8000/"
    //to make calls to local DFX replica
  });
batchTransactions() - Making Batch Transaction
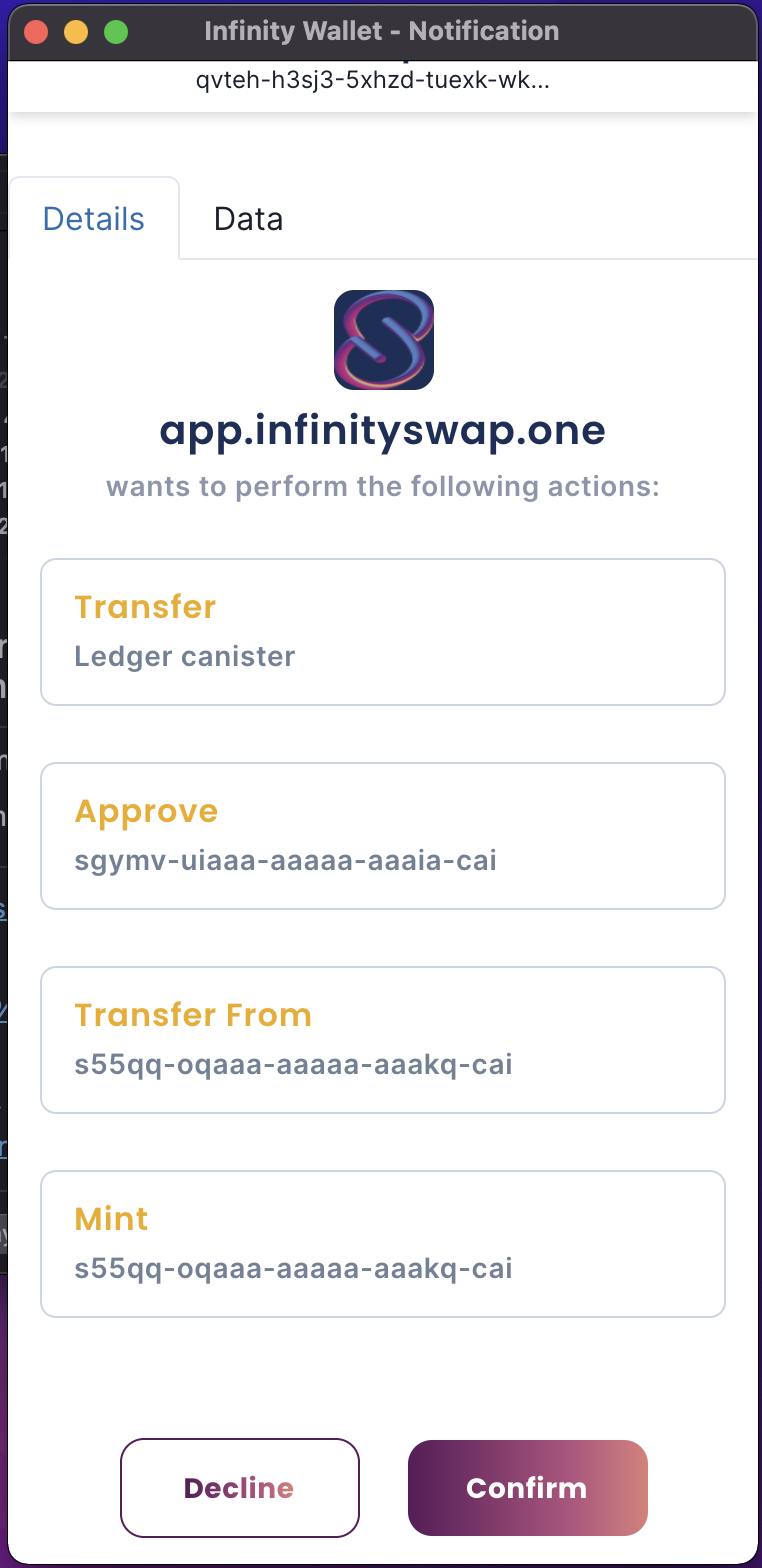
Developers can allow users to accept multiple canister update call pop-ups in one pop-up modal, instead of one-by-one. This creates a better user experience and looks similar to the image below.
This is done using the batchTransactions method in the IC Provider API.
Users will be able to quickly view what actions are being taken by the app on their behalf, or look more closely at each transaction by visiting the “Data” tab where they will be able to see the data of each transaction similarly to the image below.
To create the transactions above, we’ve written a code example below showing how users will be able to implement this in their own applications.
It's important to note two things you can't yet make batch transactions that depend on each other. That feature will come in the future. And if any transaction fails in the chain, the chain stops so you need to consider creating fallback options for this.
import { Principal } from '@dfinity/principal';
import React from 'react';
import RandomBigInt from 'random-bigint';
import { AccountIdentifier } from '@dfinity/nns';
import ledgerIDL from '../idls/ledger.did';

export const NNS_LEDGER_CID = 'ryjl3-tyaaa-aaaaa-aaaba-cai';

const TRANSFER_ICP_TX = {
  idl: ledgerIDL,
  canisterId: NNS_LEDGER_CID,
  methodName: 'send_dfx',
  args: [
    {
      to: AccountIdentifier.fromPrincipal(
        Principal.from(
          'qvteh-h3sj3-5xhzd-tuexk-wkm2u-ahnvz-xs6xg-onqn3-zhpbn-xpcss-zqe'
        )
      ).toHex(),
      fee: { e8s: BigInt(10000) },
      amount: { e8s: BigInt(1000000) },
      memo: RandomBigInt(32),
      from_subaccount: [], // For now, using default subaccount to handle ICP
      created_at_time: [],
    },
  ],
  onSuccess: async (res) => {
    console.log('transferred icp successfully');
  },
  onFail: (res) => {
    console.log('transfer icp error', res);
  },
};

const BatchTransactionsExample = () => {
  const randomTransfers = async () => {
    console.log('Doing a bunch of transfers');
    // you can set host to http://localhost:8000/ to make calls to local DFX replica
    await window.ic.infinityWallet.batchTransactions([TRANSFER_ICP_TX], { host: undefined });
    console.log('Done!');
  };
  return (
    <div className='batch-transactions-container'>
      <h2>Batch Transactions Example</h2>
      <button type='button' onClick={randomTransfers}>
        Random Transactions
      </button>
    </div>
  );
};
export default BatchTransactionsExample;
Get Principal
Here's an example, of getting the user principal id:
(async () => {
  // Canister Ids
  const nnsCanisterId = 'qoctq-giaaa-aaaaa-aaaea-cai';

  // Whitelist
  const whitelist = [nnsCanisterId];

  // Make the request
  await window.ic.infinityWallet.requestConnect({
    whitelist,
  });

  // Get the user principal id
  const principalId = await window.ic.infinityWallet.getPrincipal();

  console.log(`InfinityWallet's user principal Id is ${principalId}`);
})();
Get User Assets
The getUserAssets method returns the currrent wallet user's list of tokens/assets info.
Check the example below:
(async () => {
  // Connect to the wallet
  await window.ic.infinityWallet.requestConnect({
    whitelist: [],
  });

  // Get the current wallet user's list of tokens
  const assets = await window.ic.infinityWallet.getUserAssets();

  console.log(`User's list of tokens/assets`, assets);
})();
Conclusion
Hope you enjoyed the read, we will update this doc as more features are rolled out.
⚠️ Deprecated usage of Agent
Making calls on behalf of the user directly through the InfinityWallet Agent is no longer supported. Because InfinityWallet is not able to read all the arguments passed to that call, and considers it risky for the user to accept the action. That is why InfinityWallet has an exposed createActor method shown above.